As a Christmas decoration is incomplete without snow decoration, our Christmas nail art can not be completed without snowflakes. Let the celebrations begin and do out quick Christmas snowflake nail designs today.
If you are planning to do unique Christmas makeup for this year. Let’s start with the nail designs. You can make some easy cute but beautiful nail designs to get it a Christmas feel.
My Christmas is all about winters, snowfall, and snowman. Wear some cozy warm clothes and with a cute Santa’s cap is all you need to get ready for a Christmas eve.
But for girls, this can never be a complete look. We need to do makeup, hairstyles, and nail designs too. In winter days I personally prefer doing light makeup. Use pink, red, ivory, blue and some similar lighter shades in your makeup, nails and even dress.
Choose the dress that suits you the best. Then choose the nail colors that compliment your dress. And now start making Christmas nail art.
Today I will show you the steps of making snowflake design easily on your nails. You just have to follow these simple steps. You can also try Small flower nail design or daisy flower nail art this Christmas.
Featured Products:


Products used:
1: base coat
2: “matte 21” nail polish from “ meow cosmetics”
3: “P101” gel paints from “gel favor”
4: A liner brush
5: dotting tool
6: UV/led lamp from “missu”
7: topcoat
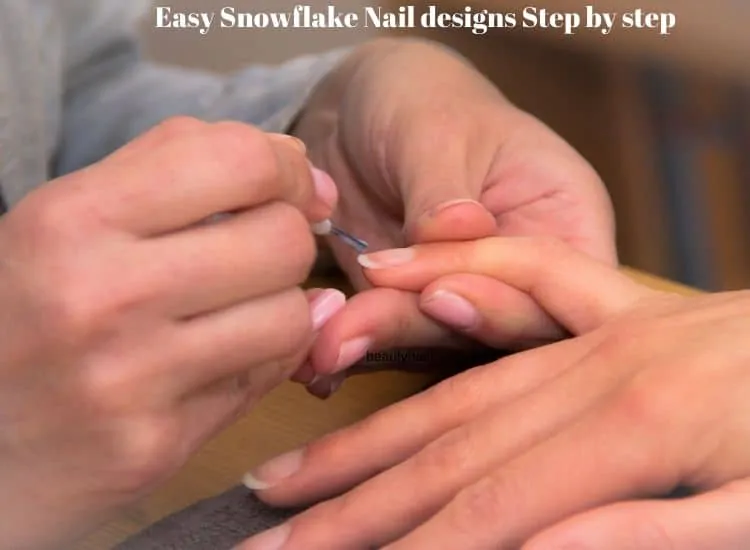
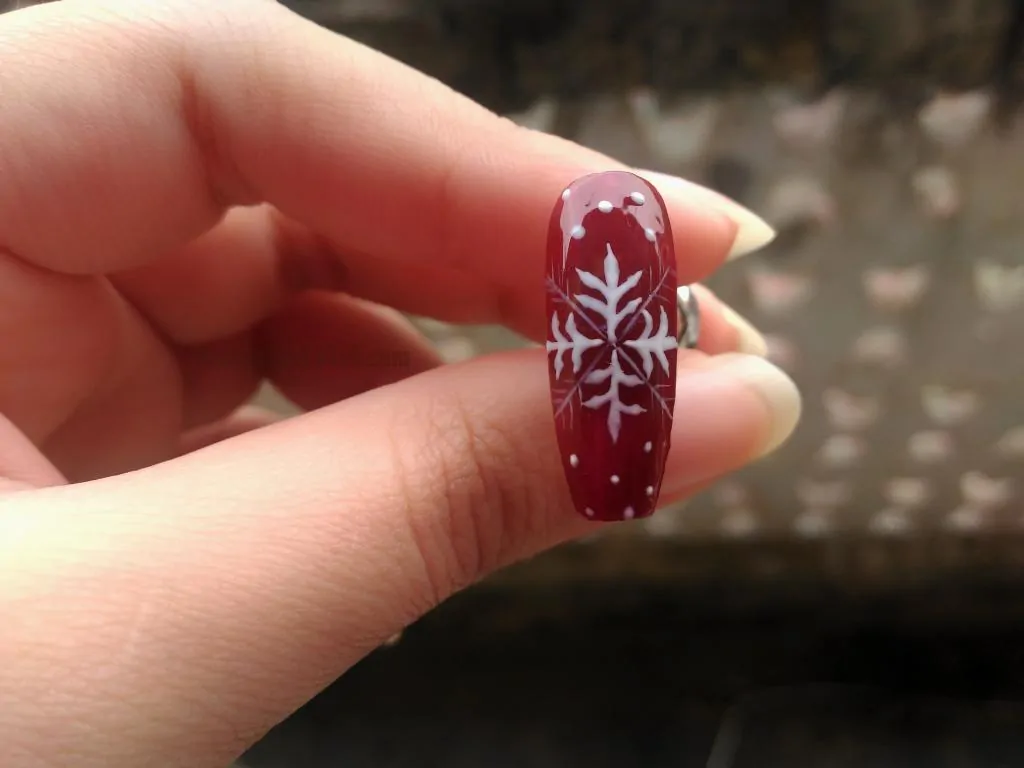
How to Make Snowflake Nail Designs?
You can make the snowflake design simply by making dots as shown in the given images. Start with basecoat as I always suggest, and end with a topcoat.
This nail art looks super cute and beautiful on nails. You can choose the colors of your choice. I think blue and white will look amazing or you can make a new combination too.
-
Start with a base
You should always start by applying a base coat on your nails. Basecoat helps your nails from staining and protects from damage. Apart from this basecoat also helps your nail polish to stick to your nails more easily.
I never suggest skipping this step. If you really want beautiful nails, you should take care of if. Proper application of a nail base coat is really important.
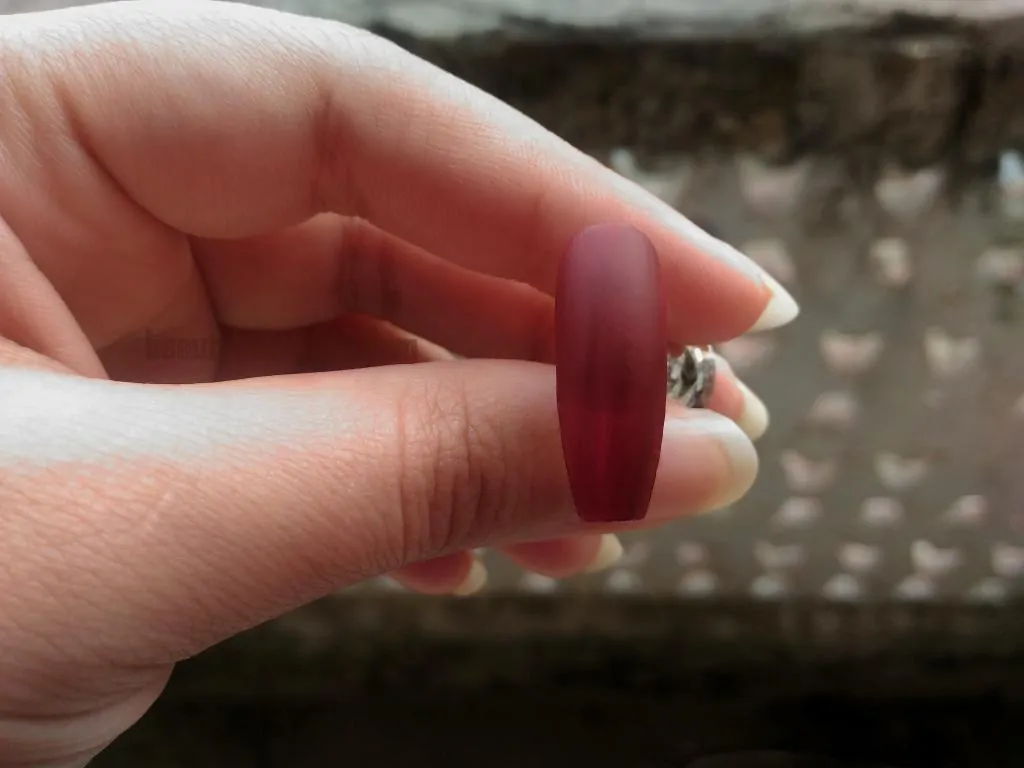
2. Apply base polish
Now give it some time to get dry. After letting your base coat fully dry, apply the red color polish as a base for the exact same design. Here I have used a matte red colored polish from meow cosmetics.
If you want to try some different colors you definitely can. Just try to choose a dark base color. Base nail polish should be darker than the main color of the snowflake. The dark base makes the design more clear and visible.
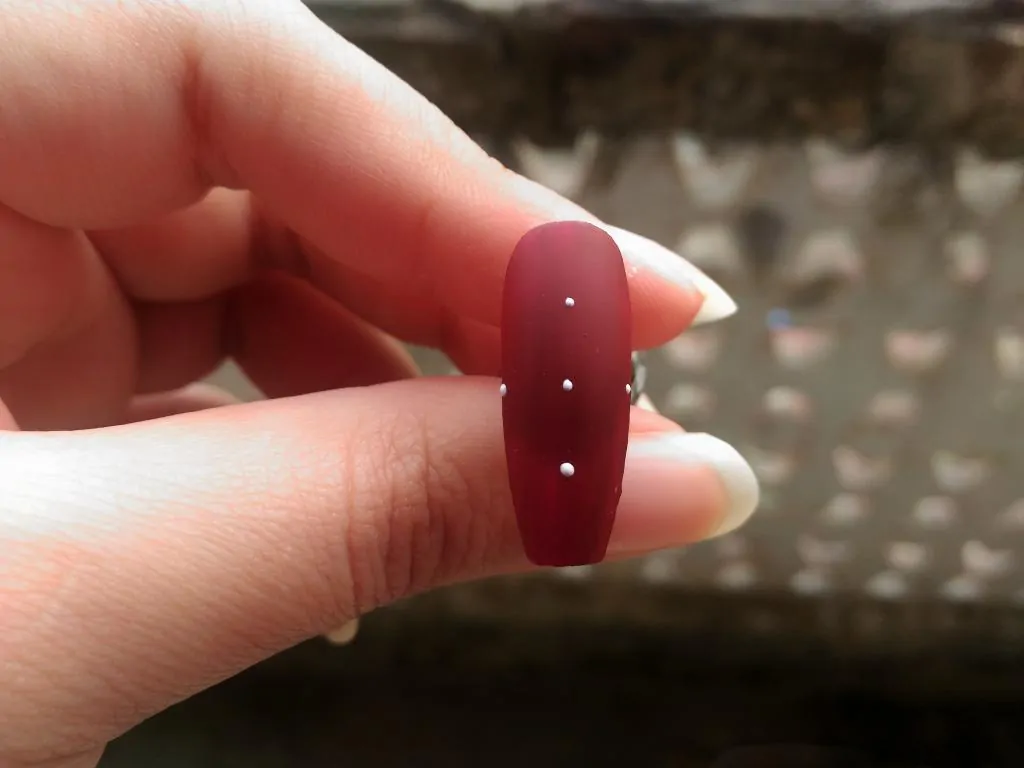
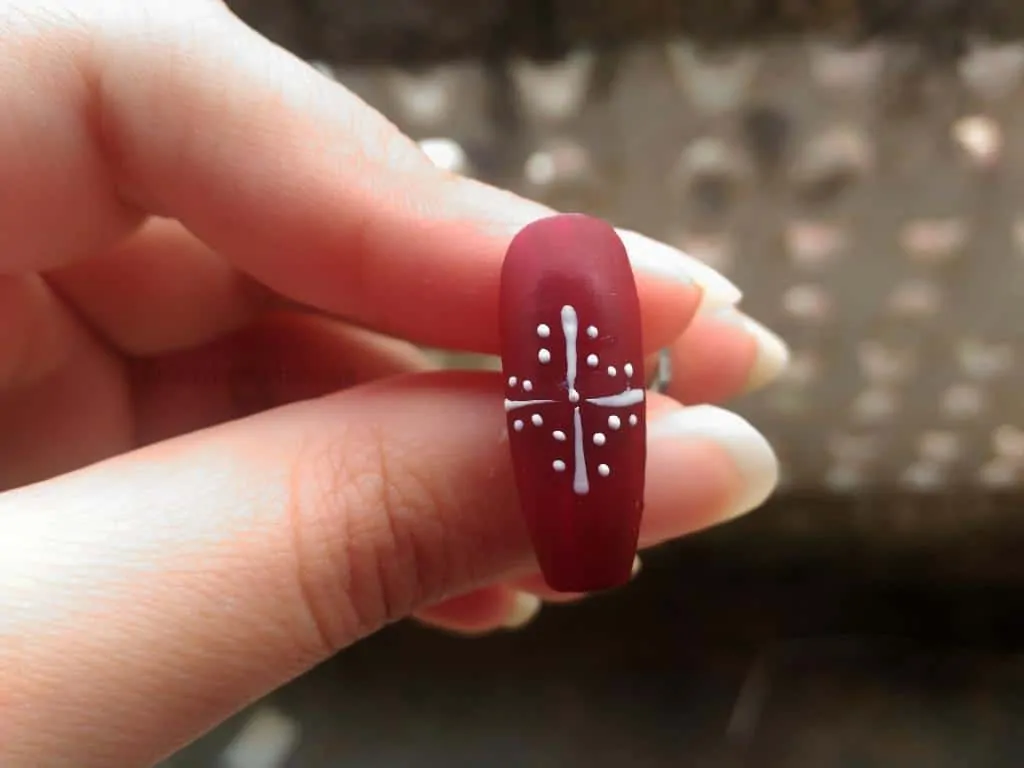
3. Start with the dots
Make one dot in the middle of your nail and then four around it. You have to make a big plus on your nail. Make dots where you want your plus (+) to end.
keep in mind that the distance between the four dots from the middle should be equal. Do it as shown in the picture. Place the dots carefully to make the design similar to the one I have made.
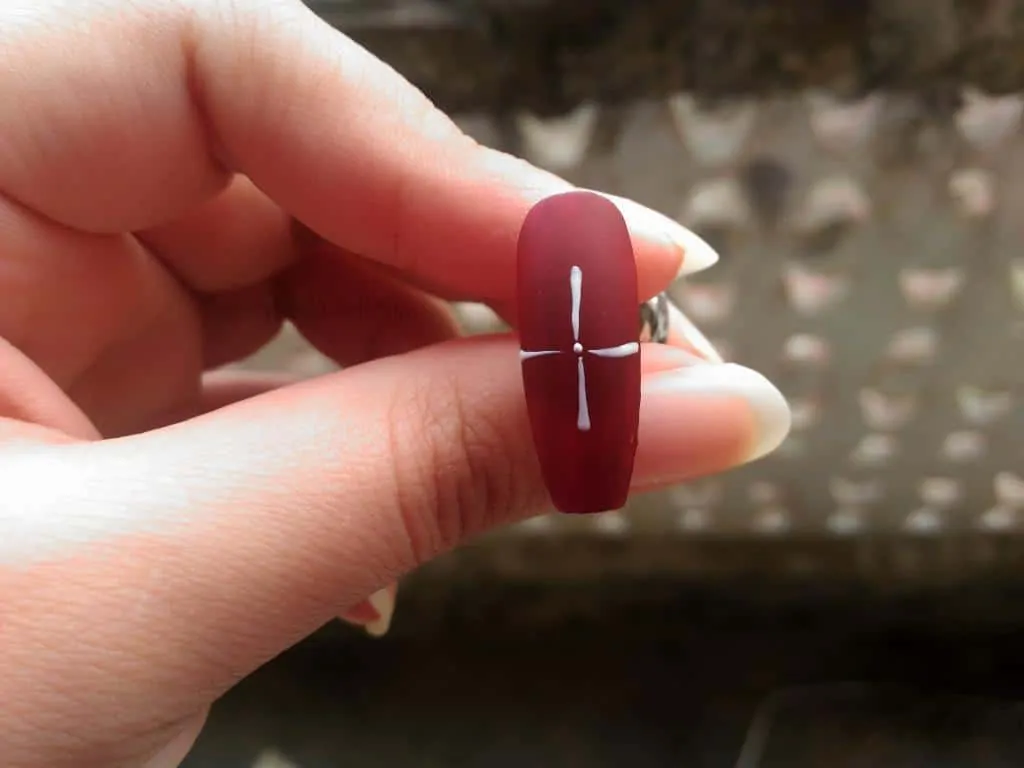
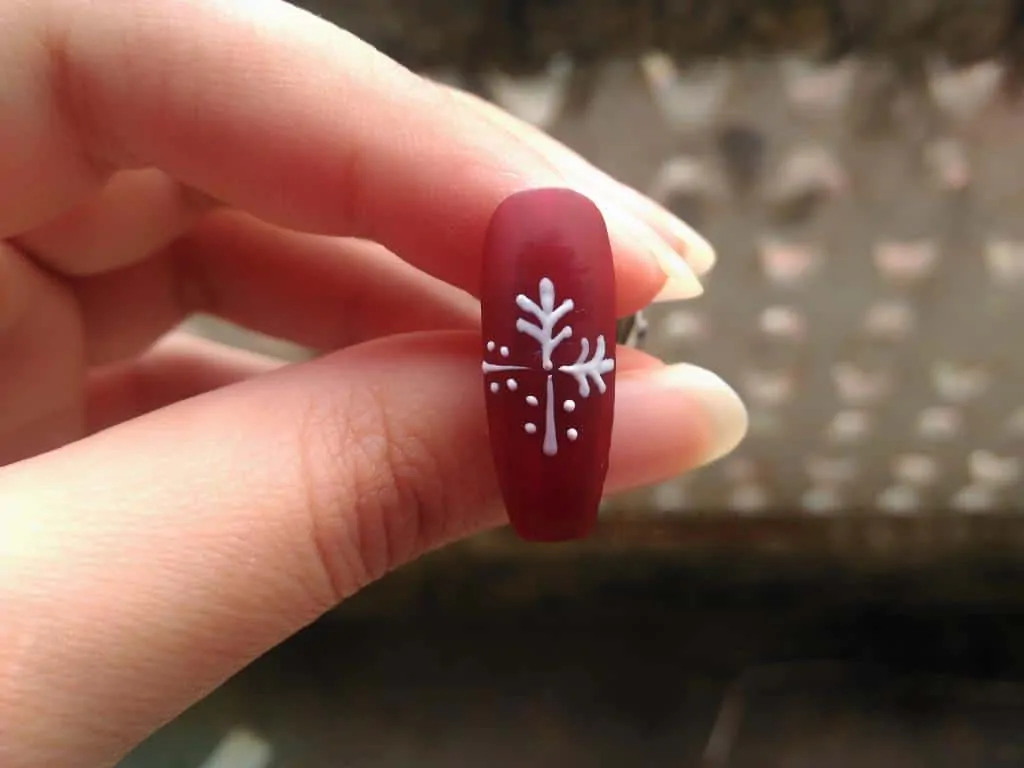
4. Join the dots
Before proceeding, do not forget to let it dry. Then join the dots from all for sides. I suggest you not to do it in a hurry. Take your time and draw the lines neatly
You have to make a plus(+) size on your nail which will cover almost 80% of your nail and for making the plus(+) sign starts with dots. Connect all the doth to the center and make a bit Plus.
5. Dots, dots, and more dots
After drawing the lines it’s time to make a few more dots. Place the dots alongside the lines you draw.
Place all the dots carefully with the dotting tool so as to avoid any mess. make two dots on each side of the line. There should be 16 dots in total.
The number of dots also depends on the length of your nails and size for the snowflake you want to make. But basically 16 dots should be there.
6. Connect all together
After making dots, draw the line to the middle just like you did earlier in step 4 above. But this time, lines would be smaller than the previous one.
Just continue connecting the dots with small lines with the bigger lines in the middle. It looks more similar to the leaf-like structure. You can make these lines a bit curved towards the middle of the nails too.
There is nothing like you have to strictly follow the rules. But try to make then look clean and beautiful together. Do not mess with the design, keep it as simple as you can.
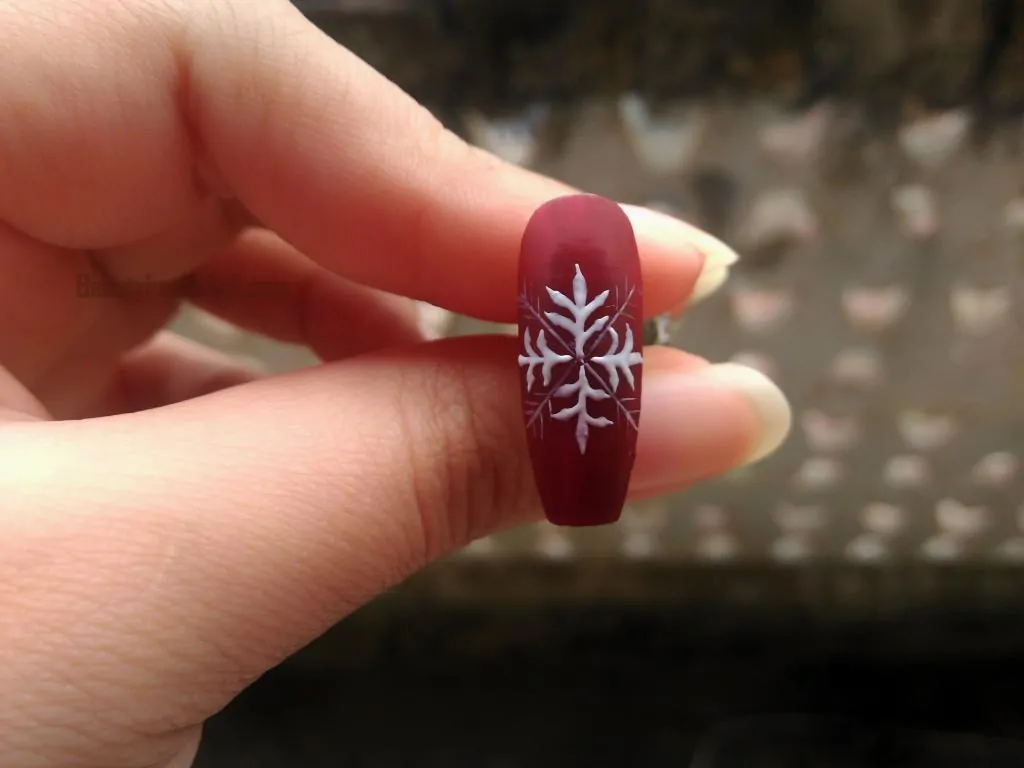
7. Fill the space
After drawing the lines and connecting small dots with the main lines, time to fill empty space. you will notice a small space left between the designs you made with dots and lines.
There you will draw a very thin line forming a cross. The line should be very thin and should be drawn with a very little color. So that it will look like a background line.
If you draw them like you draw other lines till now than it will make the design look messy. And that thing we don’t want to happen so you should have to make the lines very thin.
You don’t have to make these lines bold and very attractive. These lines and patters will fill up the empty spaces and also give your design a more realistic snowflake look.
At this point, the design is almost finished, here you have two choices one- to stop here and skip the next step. Then continue doing the further steps. In both ways, the design will look great.
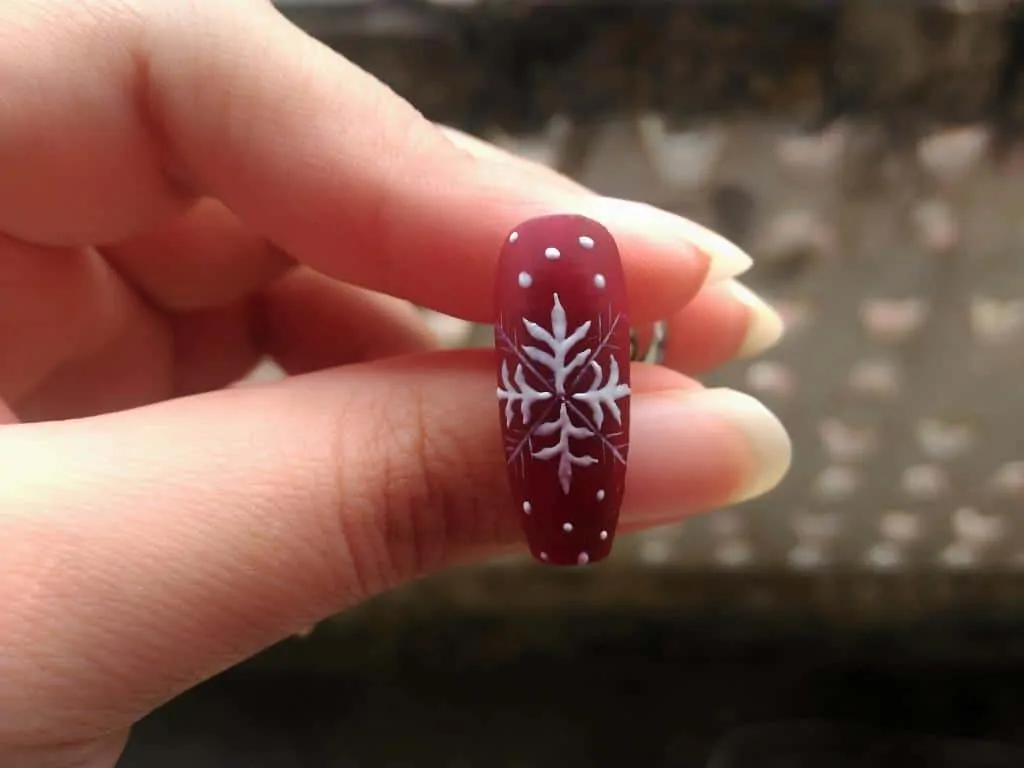
8. Give your snowflake nail designs a snow touch
At this stage, your snowflake is ready. But I like it with denser and filled up with snow everywhere. After completing the snowflake design, its time to add something more.
Here it’s time to fill the empty space which is left after drawing the big snowflake. Take the small-sized dotting tool and Draw some random dots and fill the empty space.
You only have to make few dots here and there to fill the space so keep in mind that you don’t overdo it. just give your nail a snowfall touch with lots of tiny snowflakes.
9: If you’re using gel paints for drawing the starts than cure them but if not then you can freely skip this point. gel paints take more time to get set, you have to use UV light to cure them.
10: The last and very important thing is to apply the topcoat. To seal your work and to make your design long-lasting and you’re done.
Applying Topcoat is a necessary step for you especially if you’re using the acrylics. Acrylic designs wash off with water easily. And I am sure you don’t want to waste your work like this.
Can I use Indigo blue and sky Blue for snowflake nail designs?
Yes, You can use two different shades of blue for snowflake nail art designs. Use whatever color or shade you want but it must contrast each other.
Choose one dark as indigo and one lighter shade like sky blue. You can use red-white, blue-white and many more different color combinations. Use designing tools and make proper designs with whatever color you want.
Apply base coat and base nail color before proceeding to the designs. Make your design and secure it with topcoat. Use dotting tools and brushes to make neat lines and dots for designs.
Final words
Before applying nail polish and making designs, do not forget to clean your nails. Clean, cut and file them properly. I always suggest to moisturize cuticles and nourish your nails for at least 4-5 hours.
Clean your nails at least once a week and let them breathe. File properly and apply a base coat before final nail polish coating on nails. Make different designs on your nails but never forget to do the nail care routine at least once a week or two.
That’s all for Snowflake nail designs. Do try this easy snowflake design and let me know how many compliments you get. And let us know how much you like this design. If you have any demand (any new design) just drop your comment below in the comment box and do not forget to subscribe to our blog so that you can get notification whenever your post gets published.