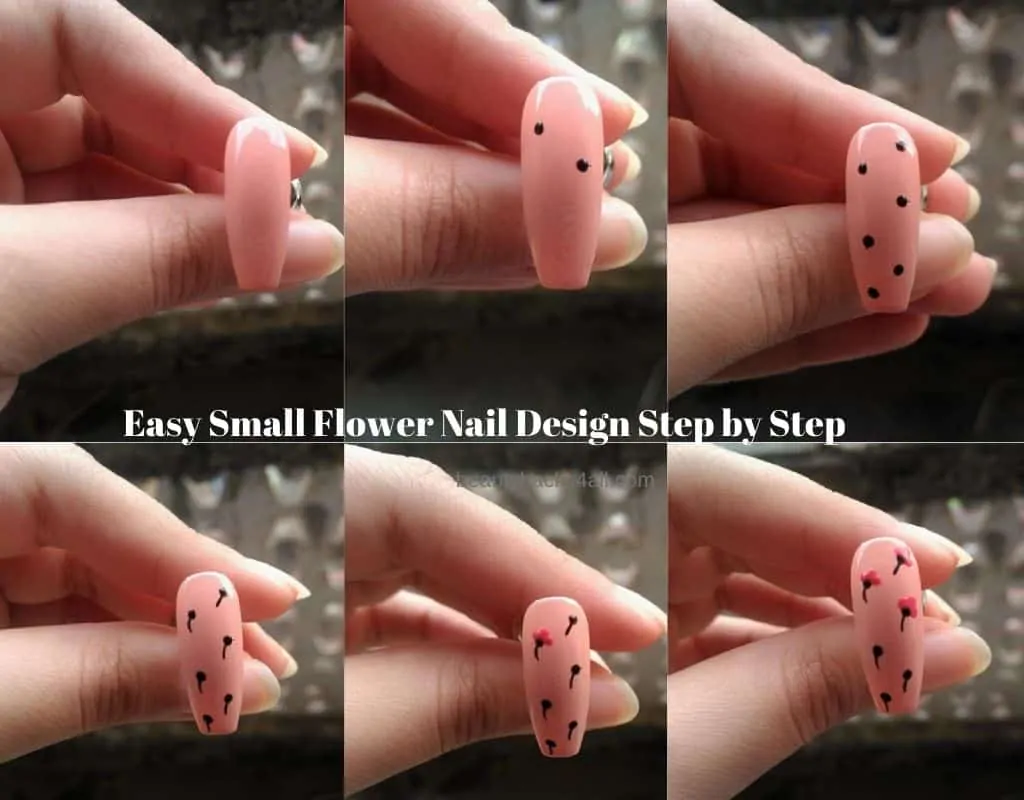
Today I will show you how I made this easy small flower nail design. Floral designs are my all-time favorite and I keep trying new designs on my nails.
I tried to make cute small flowers and it comes out amazing. It is very easy to make and also looks very pretty. You can make this design for daily go or even for any occasion.
It is not necessary to use the same products or the same nail colors. You can use it according to your choice. But if you want the exact same design, you can use the same products too.
Floral nail arts looks really cute. If you are also a floral design lover, You should also check out – Christmas Snowflake nail designs & Daisy Nail art.
Product used:-
1: Basecoat

2: number “24” from “Color Fever”
3: “P102” gel paints from “Gel Favor”
4: “Matte 08” polish from “Meow cosmetics”
5: dotting tool
6: liner Brush

7: Glossy top coat
8: UV/led lamp from “Bornpretty”

How to Make a Small Flower Nail Art design?
Start doing with a base coat, nail polish and then start making the design. The whole procedure will need patience and knowledge of making designs.
Here are the detailed procedure and steps of making small flower nail design.
Procedure :
1. Apply Base Coat
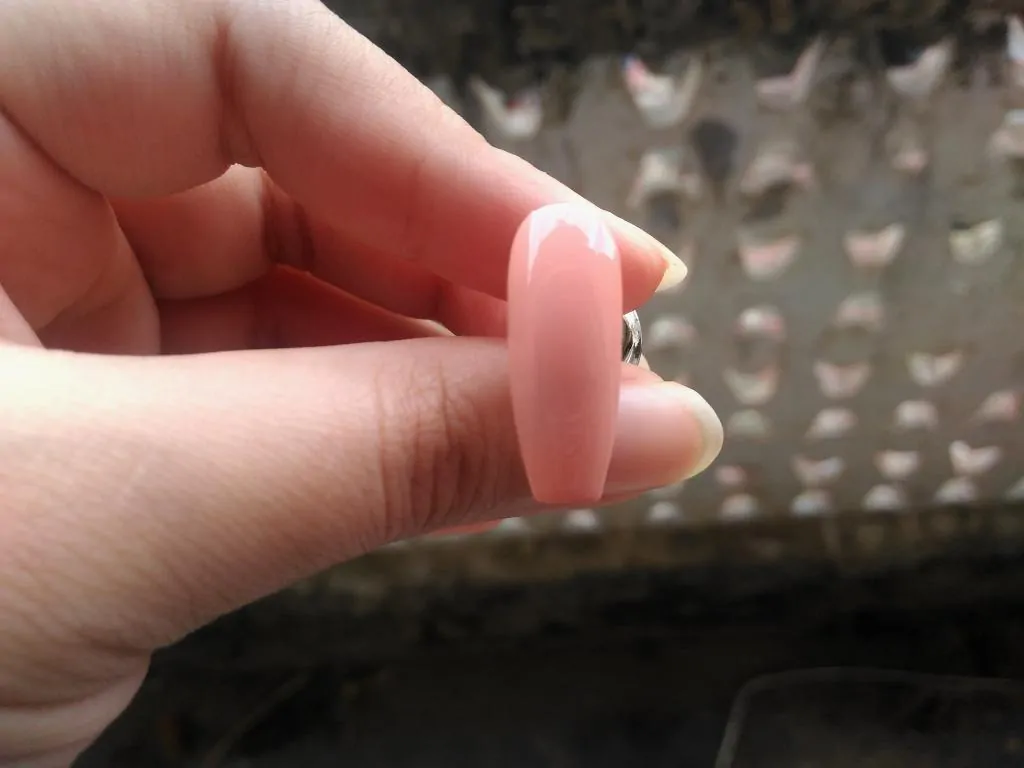
Start with a base coat application on your nails. Basecoat helps your nails from staining and protects from damage. It acts as a wall between your nails and the polish.
As you apply primer before foundation, you should apply a base coat before nail polish. Creating new nail arts and making designs looks even more beautiful on healthy nails.
Try to care for your nails and keep it away from harmful nail paints. Basecoat protects your nails to some extent. I never skip this step.
2. Let it dry for sometime
Let your base coat get fully dry. Give each step some time to set. Let it dry then apply pastel-colored nail polish.
Here I used “Color fever” number “24”. The light color polish looks Beautiful and goes with the design way better than any darker color shades.
You can choose any light shade of your choice also. This comes out really good. You should use the same color if you want exact same design and look.
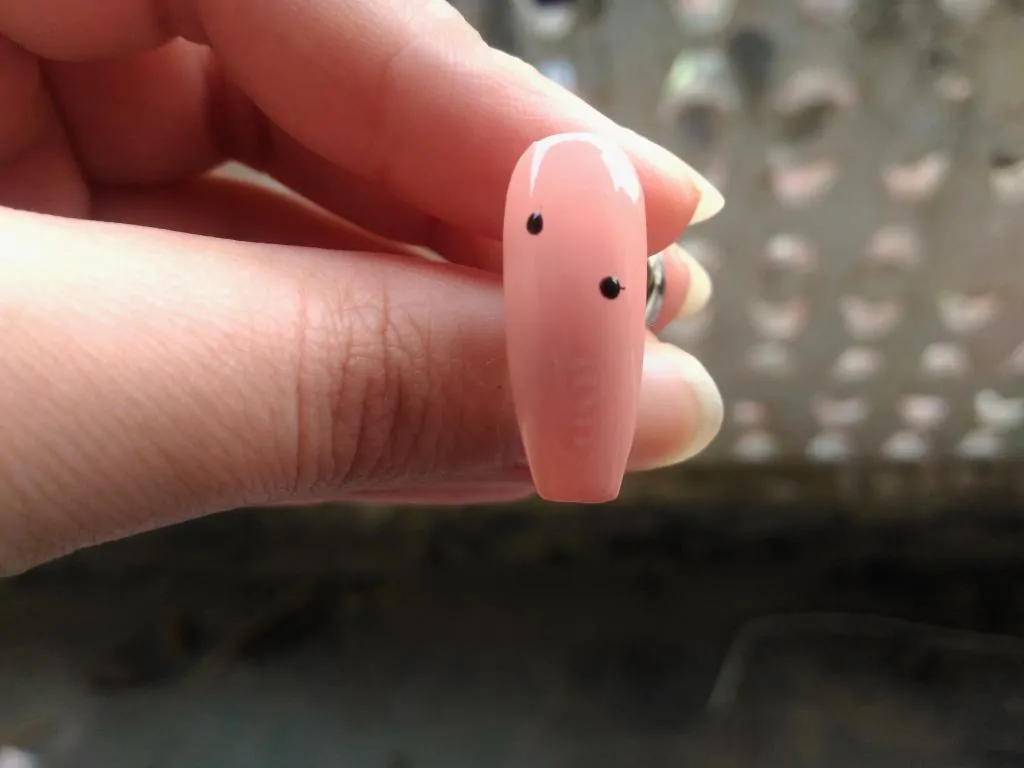
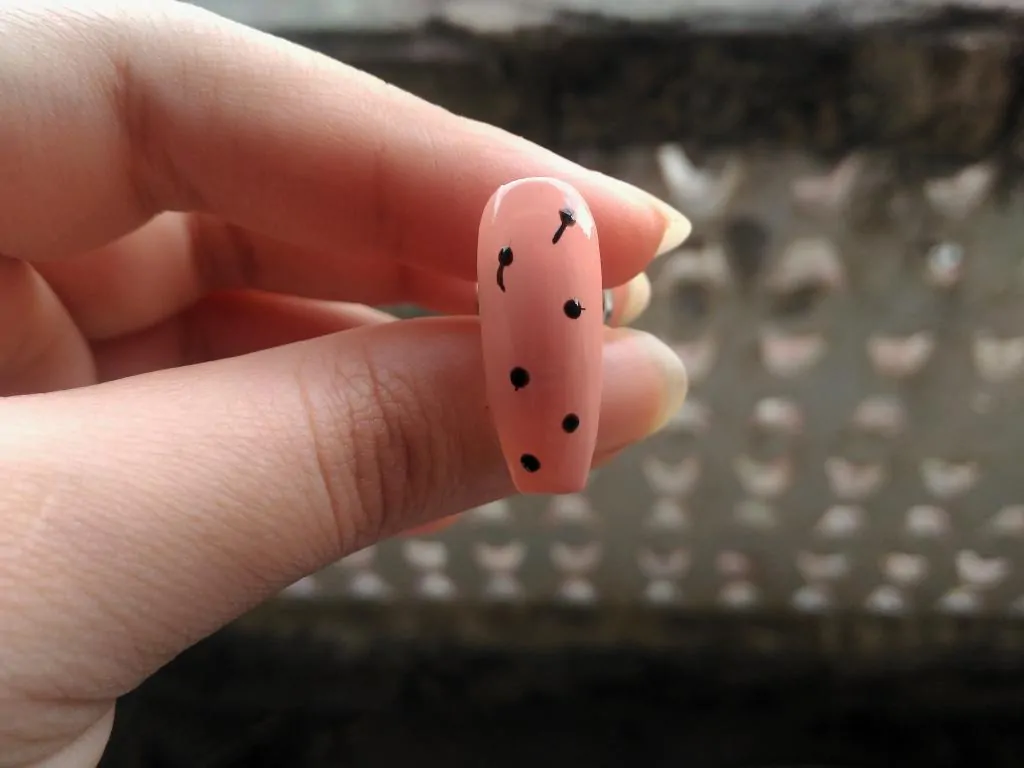
3. Make dots
Again give it some time to ger dry. So that you can proceed with the further steps easily without any mess. Do not do it in rush, take your time.
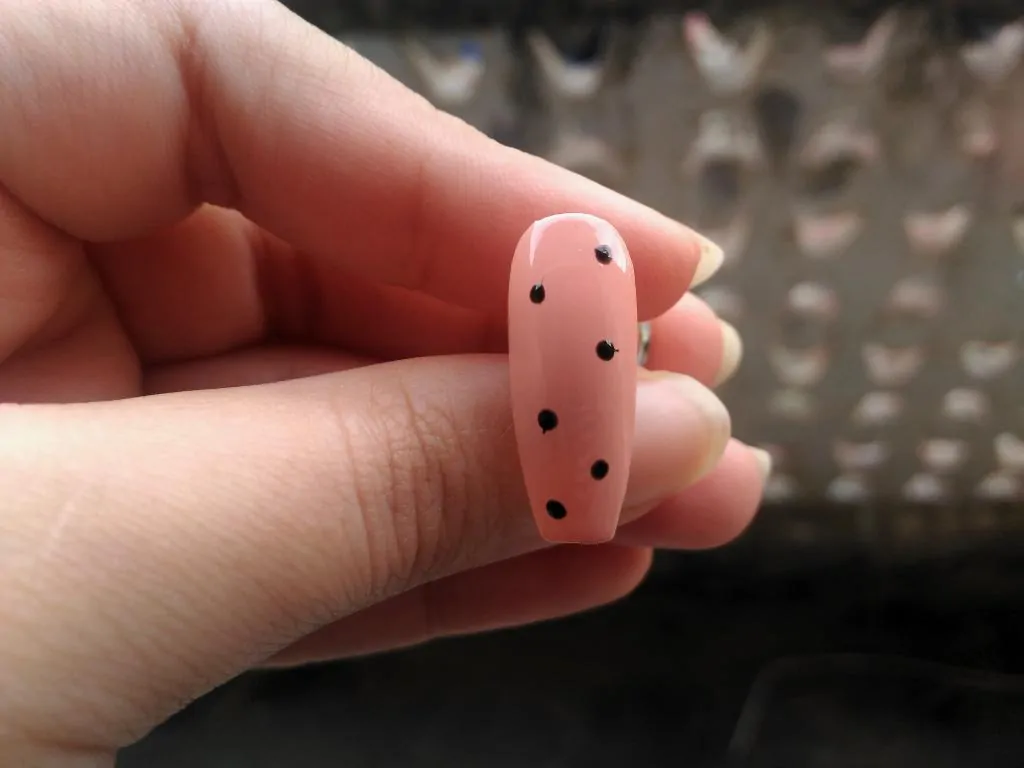
After the color polish dries, take the dotting tool and dip it in gel paints. You can choose acrylic paints too if you don’t have gel paints. Make dots on your nails as I did.
The dots have to be of normal size. It should neither too big nor too small. You have to keep in mind that the dots should not be very close to each other.
You have to make petals around the dots. If you will place the dots too close, it will look too messy. Maintain the space between the dots.
Too many dots would not look clean so keep the number per nail in check. I would suggest a maximum of 9 dots or flowers par say.
You can make as many as you like but for a simple clean look. I will recommend not to make more than 9 dots in each nail.
For example – if you want to make one or two or even four then you can. They won’t look bad at all even if you choose to make one flower on each nail. But keep in mind to make them a bit bigger adequately so that the estate won’t look too barren.
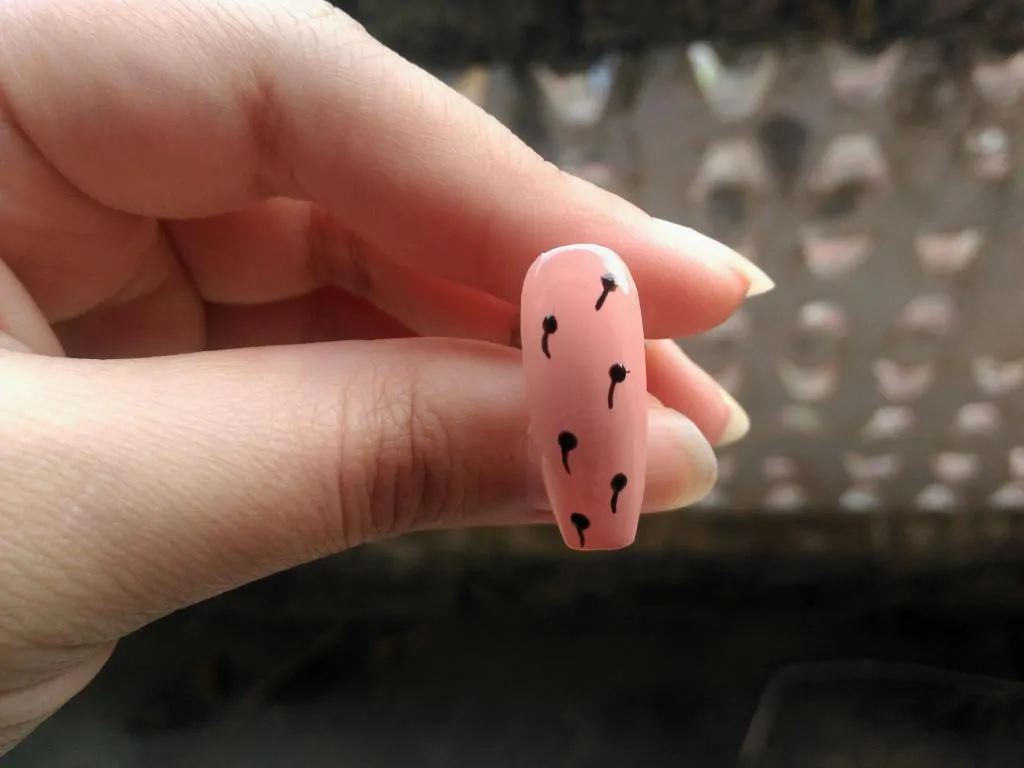
4. Make lines
After making dots, take your ‘liner Brush’ and with the same gel paint or acrylic (whichever you’re using) make a small line from the dot you made earlier.
The line you are drawing is supposed to be the stem of the little flower. It can be straight or even curved too. You can make some stems straight and some a little bit curved.
It can be of any shape but it should look like a cute small stem. Do not make a strictly straight line because it won’t look naturally beautiful.
Arrange some curved and straight together. Curve some stems left and some to the right side or straight. You can do exact the same way I am doing.
5. Time to cure your nails
Now it’s time to cure your gel paint. Put your nails under a UV/led lamp and cure your gel paint.
I always use a “born pretty” UV/led lamp of 6W to cure my gels. It cures within 60sec and works on every gel. I suggest you cure the gel paint at this point.
The next part might get messy if you don’t cure the gel now. As the black gel gets mixed with the other bright color gel. And ruins the shade which you are using for flower petals.
If you’re not using gel paints from the starting then you can freely skip this point. Gel nail polish needs to cure using UV/LED lamp.
6. Time to make petals

After making all the stems, again you will need your dotting tool. Dip it in the color polish with which you want to make the petals of the flowers.
Here I used “matte 08” from “meow cosmetics”. I didn’t have the bright shade in gel paints at that moment so I decided to choose a normal polish.
But if you have the color of your choice in gel or acrylic then you can continue drawing with the same. The color you choose for Petals should be of bright and lovely color because you’re making a flower here.
Using bright color make three dots side by side. Place it slightly above the black dot you made earlier (mentioned on point 3). The dots you’re making have to touch the black dot so that they look like they are the petals that are sprouting from it.
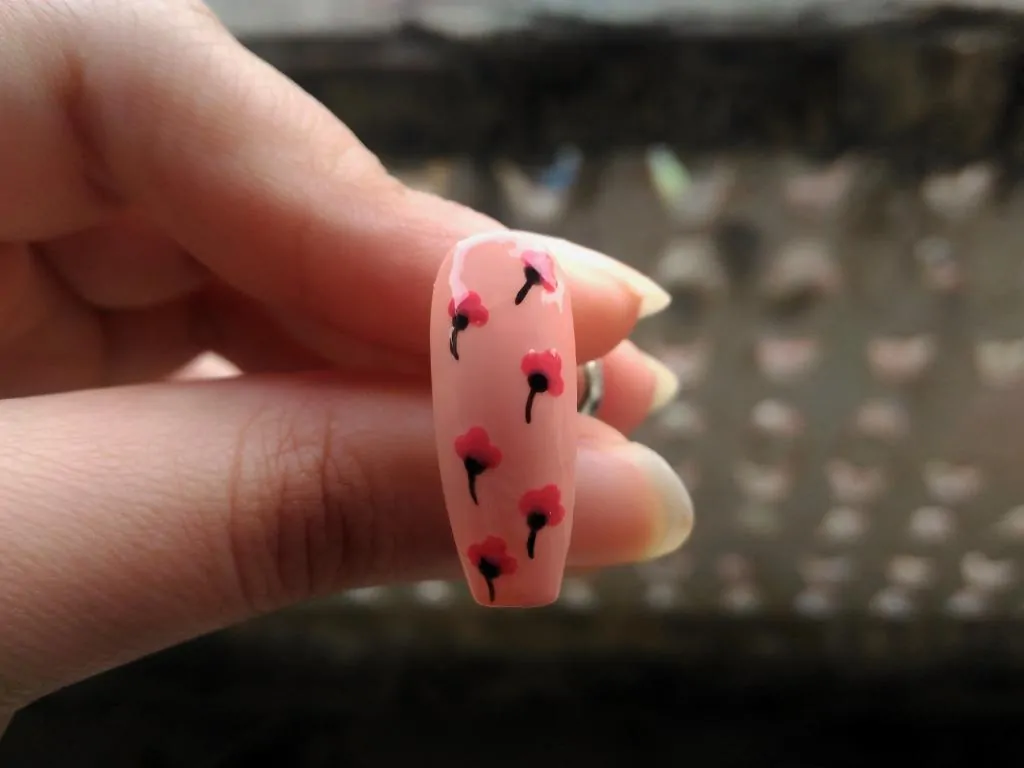
7. Fill all the dots
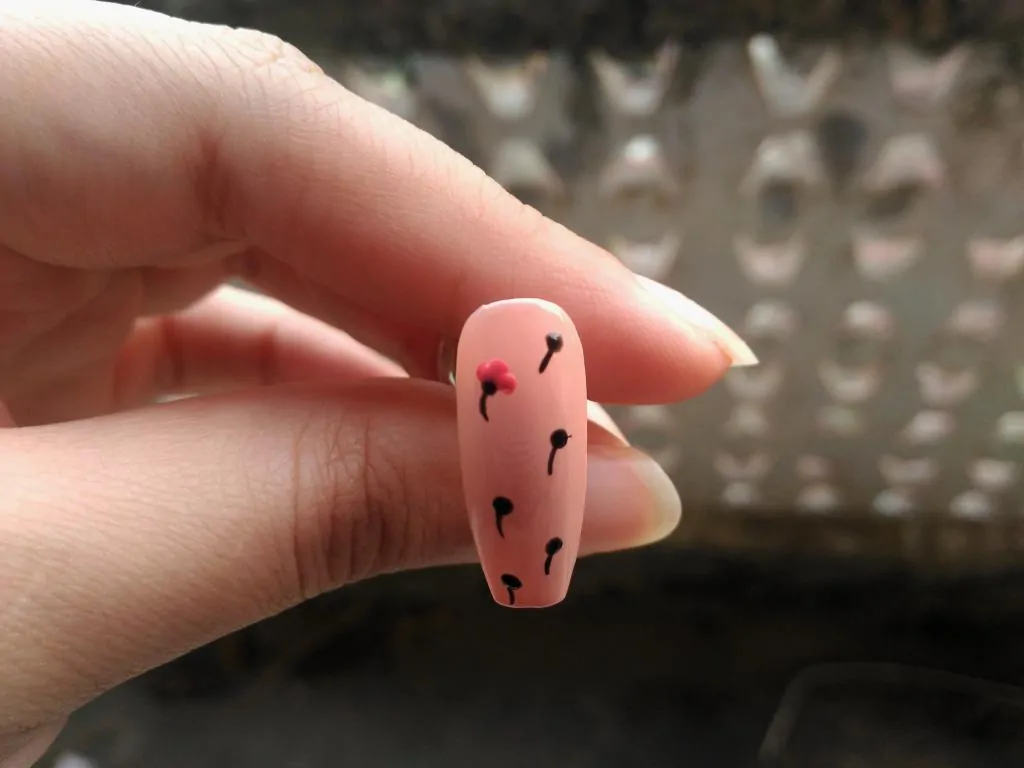
Try to place these petal dots a bit closer to each other. Just place all the three dots together without leaving unnecessary space, as I did.
If you’re using gel than cure them again. Some advice: If you want to show the three petals individually, cure them one by one. This will give a more detailed look at three individual petals.
If You will cure each petal separately, you’ll feel the three different dots. But if you’ll cure it altogether, it will look like a pretty big flower. They will get mixed with each other and became a flower that would look prettier in my opinion.
8. Do not skip Topcoat
The last and very important thing is to apply the topcoat. To seal your work and to make your design long-lasting you should apply topcoat after making designs on nails.
No matter whether you are using gel or acrylic nail paint, apply topcoat at the last. Topcoat increases the longevity of the nail art. It will stay longer than the nail designs without topcoat.
Final words:
I hear many people ask about why applying topcoat on your polish if you’re doing nail arts? The reason for applying topcoat on your manicure is to seal the design in. The topcoat act as a barrier, safeguard, a protective layer to save your manicure from chipping. The topcoat also smoothens out the design and gives a fine finish to your nails.