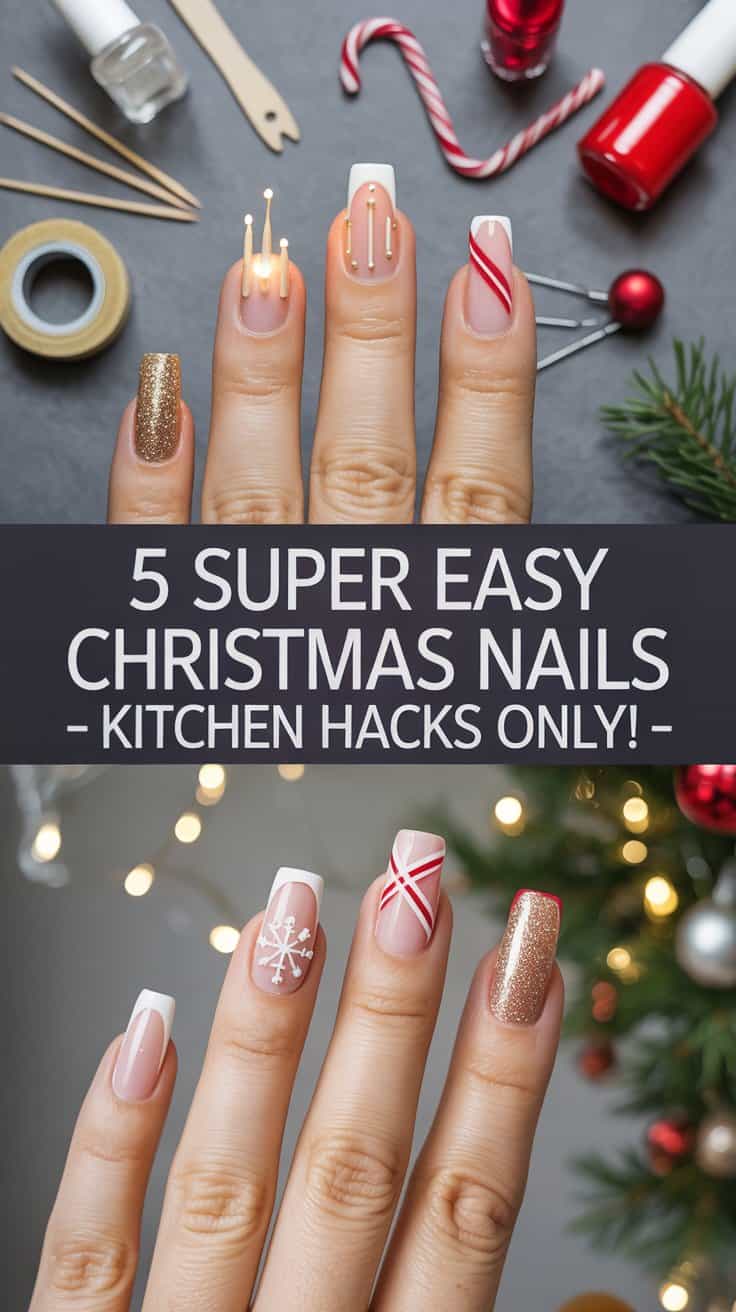
Hey beauty lovers! Tired of scrolling through nail art that requires 20 tools you don’t own? This guide is for YOU—the absolute beginner who wants festive Christmas nails using stuff already in your kitchen drawer.
No dotting tools, no striping tape, no fancy brushes. Just toothpicks, tape, bobby pins, and polish, you probably have. Three dead-simple designs that look salon-worthy but take 10 minutes max.
Perfect when you’re rushing for holiday parties or family photos. Let’s make your nails sparkle without the stress!
Check out the previous Post on Easy Festive Nail Art Ideas for Beginners: Step-by-Step Guide
Your 5 No-Tool Nail Hacks
-
Design 1: Glitter accent nail (5 mins —easiest ever!)
-
Design 2: Toothpick Christmas lights (7 mins —adorable!)
-
Design 3: Tape stripe candy cane (8 mins —crisp lines!)
-
Design 4: Bobby pin snowflakes (6 mins —Quick holiday feel!)
- Design 5: Sponge glitter French tips (5 mins)
-
Total time: Under 30-40 minutes for both hands
-
Pro result: Yes, even if you’ve never done nails before!
What You’ll Need (Kitchen + Drugstore Finds)
“Nail art doesn’t need a fancy kit!” Grab clear base coat + top coat, red/white/gold polish (old bottles work!), glitter if you have it. Kitchen heroes: toothpick (dots + lines), Scotch tape (perfect stripes), bobby pin (tiny details).
“Your junk drawer = nail salon!”
“Set up for success!” A clear base coat prevents stains, and a top coat locks in shine- Red/white/gold polish (old bottles fine!). Shake well before use.
“Shaky hands? No problem!” Work on your left hand first. Cotton pad + acetone = instant fixes. The newspaper protects the table.
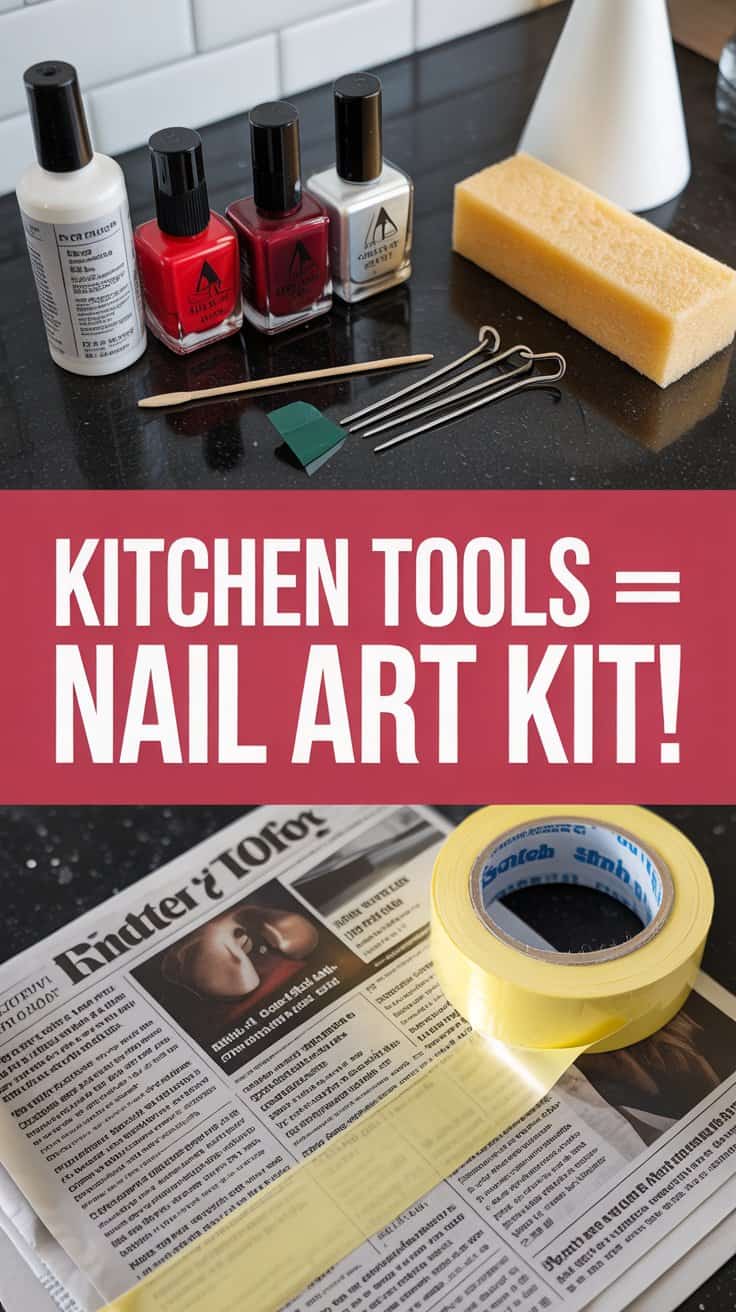
Pro list: Grab these—no shopping required
-
Clear base coat + top coat
-
Red, white, gold/silver polish (whatever you have)
-
Glitter polish (optional but cute)
-
Kitchen items: toothpick, Scotch tape, bobby pin
That’s it! Old Polish works fine. Shake bottles well before starting.
My fav Amazon products:
Base/top coat, Festive Polish set
Design 1: Single Glitter Accent Nail
“One nail steals the show—zero stress!” This design screams festive without overwhelming your hands. Pick ring finger (or pinky) as your “accent star.” Paint ALL nails 2 thin coats red, nude, or white base—whatever matches your outfit. Dry 5 full minutes (hairdryer on cool speeds it up). Dip the toothpick tip in glitter polish, dab 3-5 scattered dots on the accent nail only—like fallen snow, ornaments, or holiday confetti.
“Little glitter, big holiday cheer!” – BeautyHacks4All
Clean a toothpick in acetone, drag dots slightly outward for a streak effect (optional). Top coat EVERY nail generously—seals shine, smooths texture.
“Why it works every time?”
-
Single accent = balanced, not busy
-
Glitter dots hide imperfections
-
5 minutes total per hand

“The simplest sparkle shines brightest!” – BeautyHacks4All
Troubleshooting: Blobs? Wipe with an acetone toothpick. Too sparse? Add 2 more dots.
Scale up: Glitter thumb too for a bold vibe. Perfect for family photos—your nails pop without trying hard. Everyone asks, “Salon?” Say “Kitchen drawer!”
Design 2: Toothpick Christmas Lights
“String lights on your fingers? YES PLEASE!” This adorable design mimics holiday lights using one toothpick. Paint all nails white or nude base (2 coats). Dry completely (10 mins—patience!). Dip toothpick in brown/gold polish (wire color), drag thin horizontal line across middle of 2 nails (index + middle).
“Crooked line? Even cuter!”
Clean toothpick, dip in red polish—dot 4-5 “bulbs” along wire. Repeat with green/yellow on the other nail. Slightly overlap dots for realism. Use the toothpick tip to nudge if needed. Top coat seals + adds glassy shine.
“Make it yours.”
-
Short nails: 3 bulbs
-
Long nails: 6-7 bulbs
-
No brown? Black works!
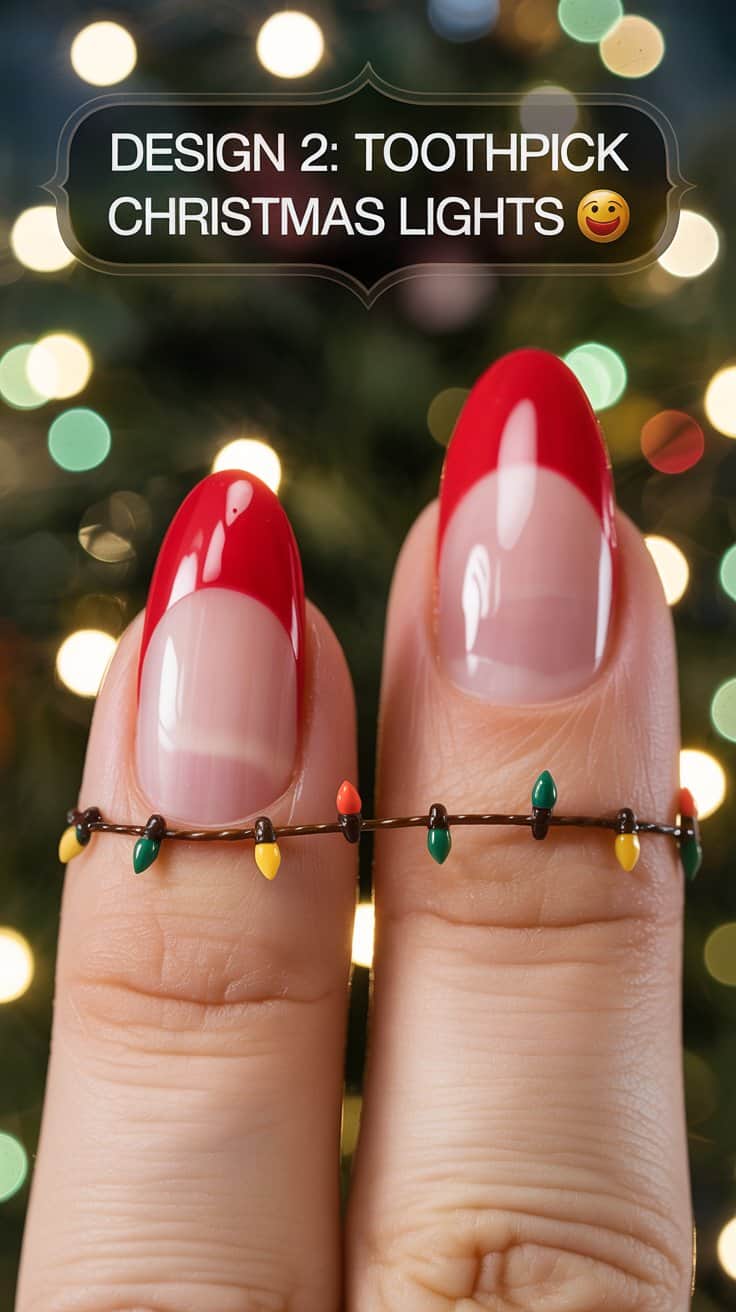
“Holiday magic starts at your fingertips!” – BeautyHacks4All
Level up: Add a tiny white highlight dot on each bulb. Mistake fix: Dots too big? Use the bobby pin end. Smudged wire? Layer white base, restart. Scale for parties: lights on thumbs too! Looks custom but takes 7 minutes. Guests think pro artist—your secret weapon!
Design 3: Tape Stripe Candy Cane
“Candy cane perfection without steady hands!” Iconic holiday stripes on ONE nail (middle finger shines). Paint ALL nails white base (2 coats—opacity matters). While tacky (not wet), cut Scotch tape into 1/4″ strips (kitchen scissors). Stick tape diagonally, corner-to-corner, on the accent nail.
“Tape does the hard work!”
Paint over with red polish—full coverage. Count to 10, peel tape SLOWLY (pulls perfect lines). Clean tiny edges with an acetone toothpick. Add a second diagonal tape strip opposite direction for a criss-cross candy cane. Red over again, peel. Top coat generously.
“Tape hack secrets.”
-
Press firm, peel slowly
-
Wet-ish base = better stick
-
No tape? Paint freehand

“Straight lines guaranteed—or your kitchen tape back!” – BeautyHacks4All
Custom twists: Vertical stripes for pencils. Pink/green for fun. Oops fixes: Red bleed? Q-tip + acetone. Faint lines? Second red coat. Looks bakery-fresh—8 minutes magic! Party conversation starter: “Tape trick? Genius!”
Design 4: Bobby Pin Snowflakes
“Winter wonderland on ONE nail!” Paint all nails with an icy blue, silver, or white base (2 coats)- Dry 5 mins. Bend the bobby pin slightly into a V shape (at the kitchen table edge). Dip the rounded end in white/silver polish.
“Bobby pin = snowflake maker!”
Press gently on the accent nail corner to create a perfect 6-point star. Lift slowly. Repeat 3 more times around the nail, rotating slightly for a natural cluster. Clean a bobby pin between colors. Add tiny toothpick blue center dots. Top coat seals delicate flakes.
“Snowflake perfection:”
-
Blue base = sky vibe
-
Silver base = frosty glam
-
White = pure snow
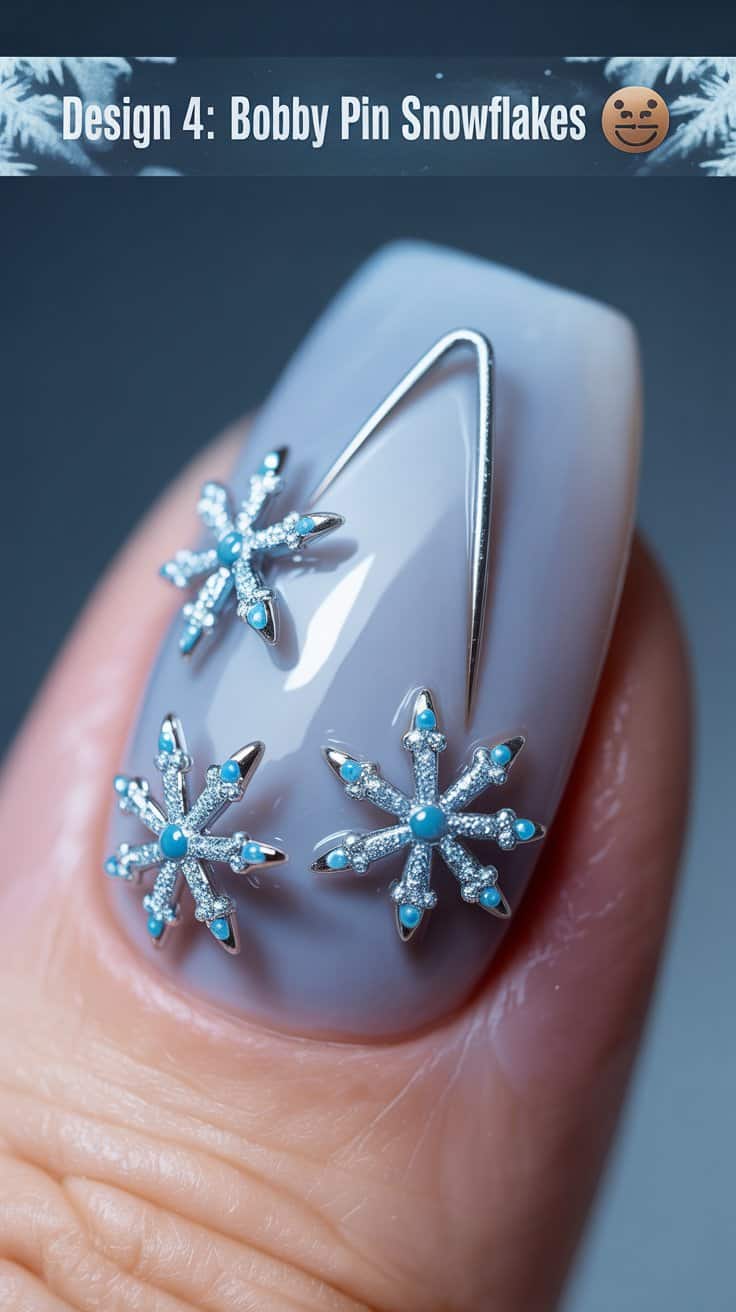
“Flakes fall perfectly from your drawer!” – BeautyHacks4All
Customize: Pink snow for fun. Gold flakes are fancy.
Fixes: Smudged? Acetone bobby pin. Too big? Smaller dip. 6 minutes ethereal winter magic! Pairs perfectly with glitter accents or lights.
Design 5: Sponge Glitter French Tips
“Effortless sparkle French manicure!” Paint all nails nude/pink base (2 coats—soft elegance). Cut a kitchen sponge into a 1/4″ strip (kitchen scissors). Dip the sponge edge in silver/gold glitter polish.
“Sponge = perfect faded tips!”
Hold steady, dab sponge lightly on nail tips—creates soft gradient sparkle. Lift straight up (no drag). Repeat 2-3 times for opacity. Glitter fades naturally to base—no harsh lines! Clean the sponge between nails. Top coat smooths texture, adds glassy shine.
“French tip made easy.”
-
Nude base = classy
-
Pink base = romantic
-
Red base = bold holiday

“Gradient glamour from your kitchen!” – BeautyHacks4All
Customize: Holo glitter rainbow vibe. Matte top coat is trendy.
Fixes: Too heavy? Sponge less polish. Uneven? Second nude layer. 5 minutes sophisticated sparkle! Perfect “grown-up” option beside playful designs.
Quick Fixes for Mess-Ups
“Even pros mess up—no panic!” Smudges? Acetone + toothpick = surgeon precision. Glitter overload? Top coat smooths. Wonky lines? Extra base coat hides. Chips? Matching polish dab + top coat.
Emergency kit: Tiny polish bottle, top coat, toothpick in a makeup bag.

“Perfect nails come from brave tries!”
Work on your left hand first. Cold fridge dries 2x faster. Still shaky? Practice on paper first.
Make Them Last Through Parties
“Party-proof your sparkle!” Thick top coat = chip shield. Gloves for dishes. Touch-up purse kit ready. Longevity hacks:
-
2nd top coat Day 2
-
Avoid acetone soak-off
-
Cuticle oil daily
-
3-5 days easy, 7 with care.
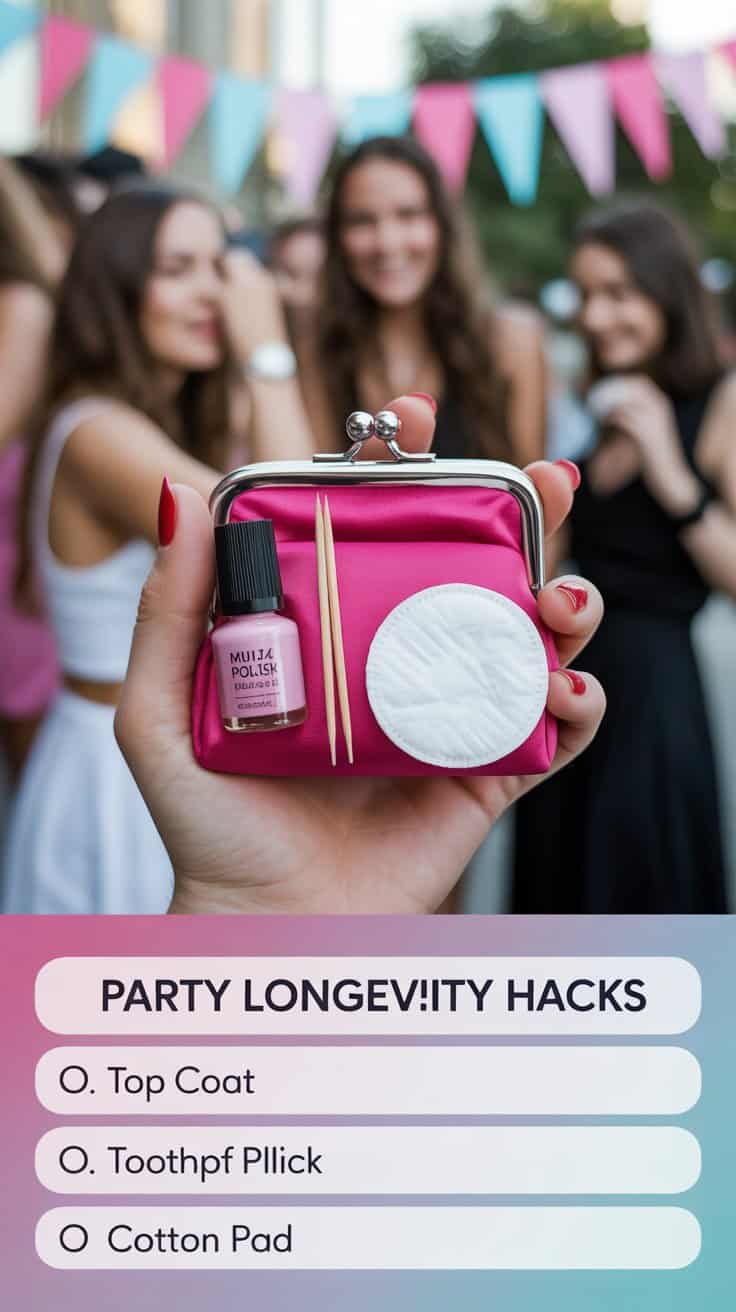
“Nails that outlast the eggnog!”
Mix & Match Ideas
“Create your signature set!” Glitter thumb + lights middle + cane ring finger. All white base = cohesive. Fun combos: Nude + gold lights. Red base + green cane.

“Your nails, your holiday story!”
Conclusion
Five kitchen-hack Christmas nails = instant holiday cheer! Glitter accent, toothpick lights, tape candy cane—pick, mix, conquer. 20-30 minutes transforms basic polish into party stunners. No skills needed, just courage. Your nails shine brighter than tinsel!