The holiday season is the perfect time to add a splash of creativity to your beauty routine, and festive nail art is a fun and stylish way to do just that. Whether you’re new to DIY nails or just want to try simple yet stunning custom designs, this beginner-friendly guide has got you covered. From classic reds and glittering golds to playful snowflakes and candy cane stripes, you’ll find easy-to-follow nail art ideas that will make your hands sparkle at every holiday gathering.

Best of all, you won’t need expensive salon visits—just basic tools and a little inspiration!
1. Essential Tools and Supplies for Beginners
Before diving into nail art, make sure you have the right tools. Here’s what you need:
-
Nail care basics: Nail file, buffer, cuticle pusher
-
Polishes: Classic holiday shades like red, gold, green, silver, plus glitter polish
-
Application aids: Dotting tools, striping tape, nail stickers, rhinestones
-
Protective coats: Base coat to protect nails, top coat to seal and extend wear
With this simple kit, you’ll be all set to create gorgeous holiday nails with ease.

Getting started with festive nail art is exciting, but the right tools can make the experience enjoyable and the results professional-looking. Beginners needn’t overwhelm themselves with expensive kits; a few fundamental supplies will do. A good nail file and buffer are essential for shaping nails neatly and smoothing any rough edges—crucial for a clean final look. Push back your cuticles gently with a cuticle pusher to create a clean canvas without damaging delicate skin.
In terms of polish, opt first for classic and versatile festive colors: think rich reds, shimmery golds, evergreen greens, silvers, and glittery topcoats for extra sparkle. These colors form the backbone of many holiday designs and allow for a variety of styles. In addition to polishes, beginner-friendly accessories like dotting tools, striping tape, nail stickers, and rhinestones can elevate simple looks with little effort. Lastly, a reliable base coat to protect your natural nails and a top coat to seal and prolong your manicure’s life are must-haves. This curated set of tools ensures you can take on any beginner design confidently, maximizing your fun and minimizing frustration.
2. Preparation: How to Get Your Nails Ready
Proper prep sets the foundation for flawless nail art. Steps to follow:
-
Clean and trim: Remove old polish and trim nails evenly
-
Shape nails: Use a file to create your desired shape (square, oval, almond)
-
Push back cuticles: Gently push cuticles for neat nail beds
-
Apply base coat: Protect your nails and extend wear of your polish
Proper nail prep prevents chipping and ensures your design looks smooth and lasts longer.
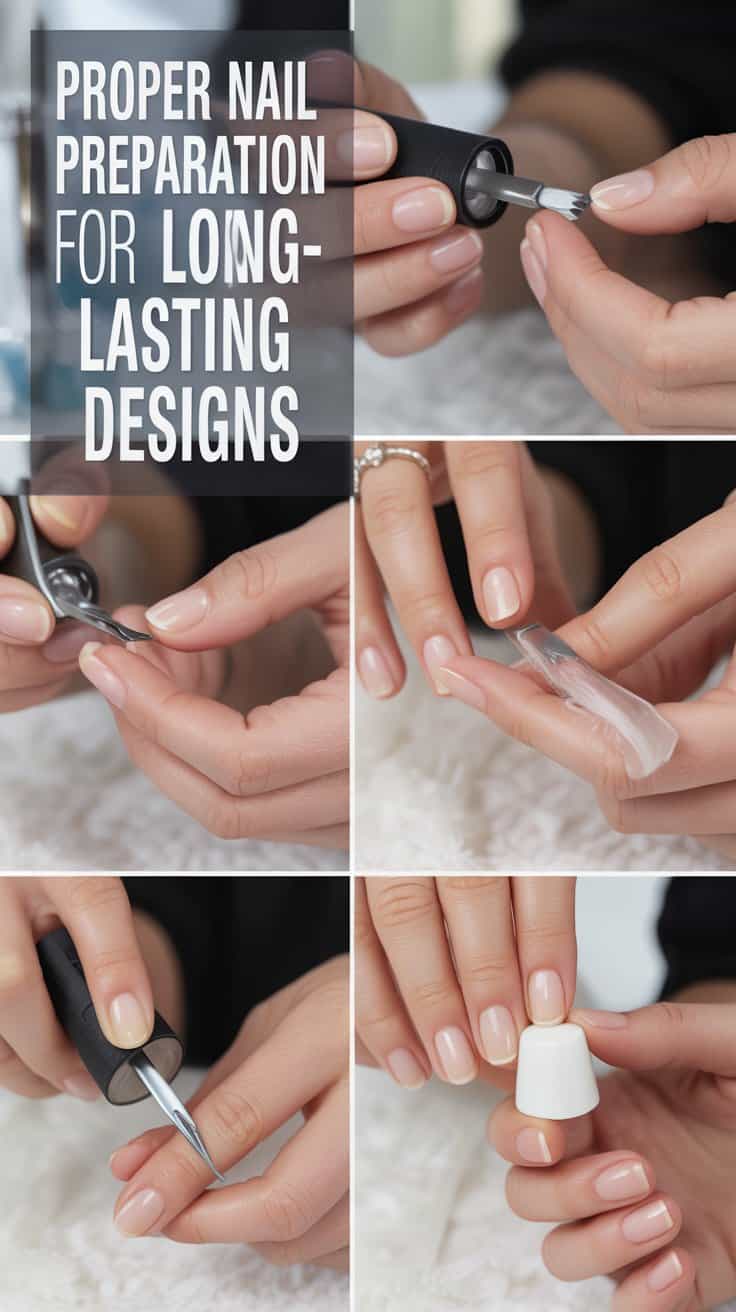
Proper nail preparation is the backbone of any great manicure or nail art design. Starting with clean, well-shaped nails not only helps polish adhere better but also significantly extends the life of your artwork. Begin by removing any old polish using an acetone-free nail polish remover to be gentle on nails. Then, trim your nails to your preferred length and shape them using a fine-quality nail file. Popular shapes for beginners include a square for stability or a soft-rounded for a classic look.
Next, hydrating and gently pushing back cuticles is key. Cuticles protect nails from infection, but loosening them without cutting lets polish lay smoothly near the nail base. Apply a cuticle oil or moisturizer after pushing back to keep skin supple. Finally, apply a thin, even layer of base coat to provide a smooth surface for your polish and protect your nails from stains—especially important with pigmented holiday colors. Don’t rush drying times. Start with a small, well-prepped canvas to set the stage for beautiful, lasting nail art.
3. Top 5 Easy Festive Nail Art Designs
Try these beginner-friendly designs perfect for holiday vibes:
-
Classic Red with Gold Tips: Red polish with shimmering gold tips for a chic look
-
Snowflake Accent Nails: White snowflake designs on accent nails over a colored base
-
Glitter Gradient Nails: Gradual sparkle from the base or tip using glitter polish
-
Candy Cane Stripes: Red and white stripes mimicking your favorite holiday treat
-
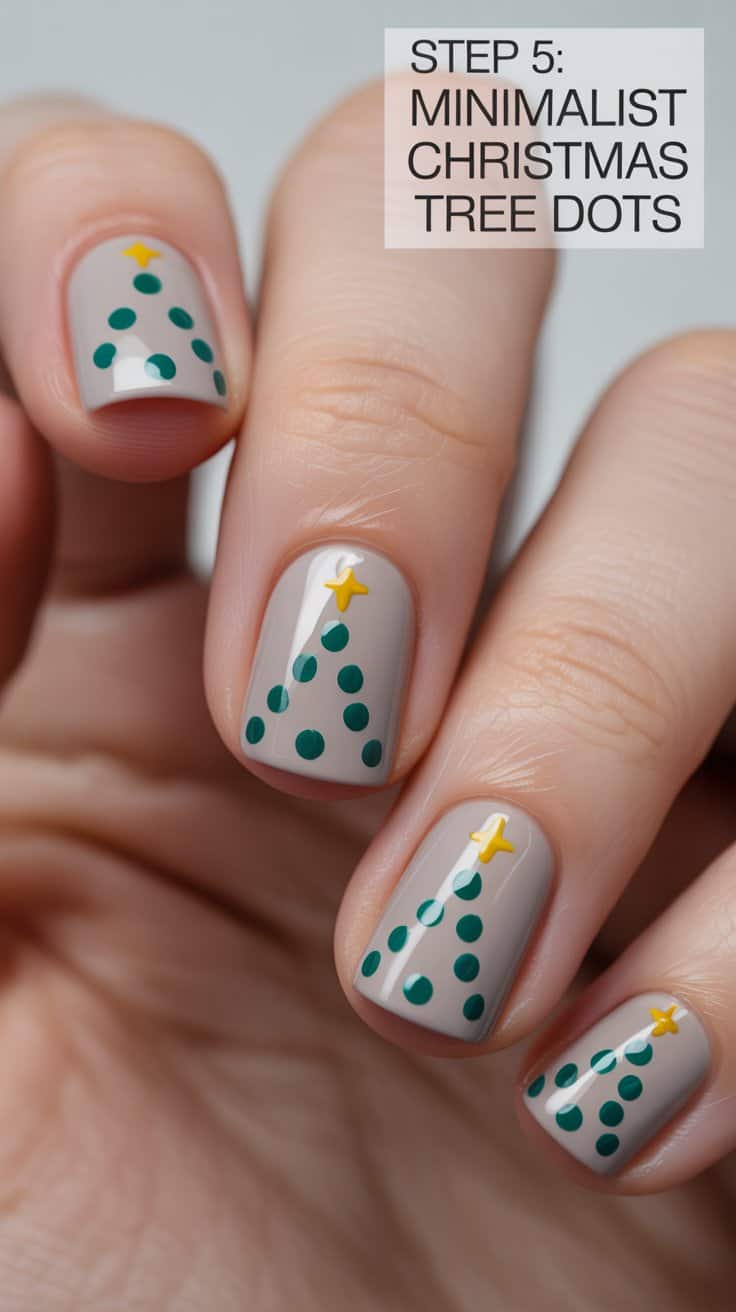
Minimalist Christmas Tree Dots: Simple green tree shapes made with dotting tools against a neutral background
Each design adds festive fun with minimal skill.
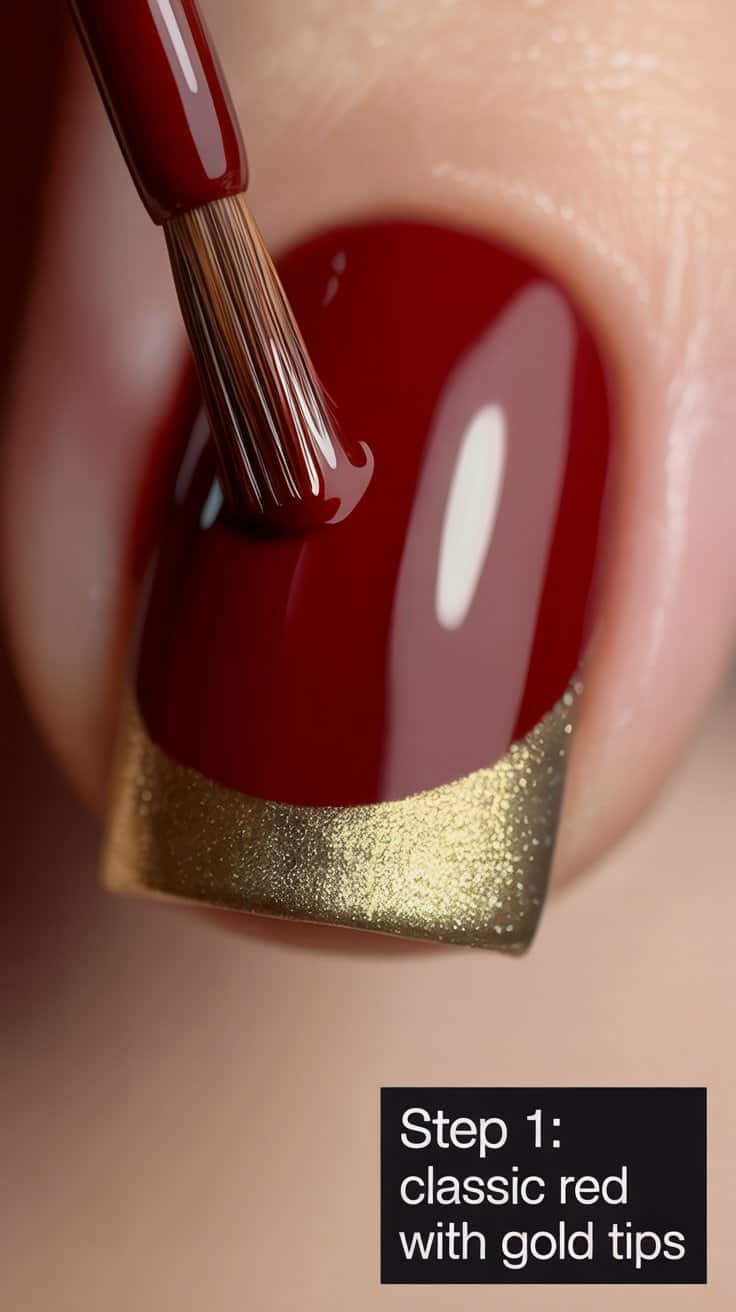
Seasonal nail art is versatile and fun, blending traditional holiday motifs with simple techniques suited for beginners. First, the Classic Red with Gold Tips design combines festive red polish with golden accents at the nail tips, offering a chic sophistication fit for any party. The gold contrast really pops, making this a timeless choice.
Next is the Snowflake Accent Nails, where one or two nails feature delicate, white or silver snowflake patterns. These contrast beautifully with darker base colors and add a magical winter vibe. The third option, Glitter Gradient Nails, gradually adds sparkle from the base or tips of the nails for a glamorous look without full coverage, ideal if you want subtle festivity.

Fourth, the Candy Cane Stripes capture holiday sweetness with red and white striped nails resembling the beloved treat. Using either striping tape or steady hand painting methods makes this surprisingly doable. Finally, the Minimalist Christmas Tree Dots create evergreen tree shapes using simple dotting tools with green polish over neutral backgrounds—a minimalist but festive statement. These designs balance visual impact with beginner accessibility perfectly.
4. Step-by-Step Instructions for Each Design
For Classic Red with Gold Tips, start with applying two thin coats of a rich red polish, allowing each to dry fully. Use a fine-tip brush or striping tape to carefully paint shimmering gold across the very tips of your nails, mimicking a French manicure but with festive flair. Seal with a clear top coat to add shine and durability.
To create Snowflake Accent Nails, select a solid base shade—deep blue or burgundy works beautifully. Using a thin nail art brush or white nail pen, draw simple snowflake patterns on one or two nails. Start with intersecting lines and add tiny branches or dots to mimic snowflakes. Apply a top coat for smoothness and protection.
For Glitter Gradient Nails, after applying a base color, dab glitter polish lightly starting on the nail tips or base, then gently brush towards the center to fade the effect. This creates a sparkling gradient that’s eye-catching yet classy.
For Candy Cane Stripes, paint your nails white first. After drying, use thin striping tape or a steady hand with red polish to create diagonal or vertical stripes. Top with top coat for a smooth, polished finish.
For Minimalist Christmas Tree Dots, apply a nude or soft neutral base. Using a dotting tool or toothpick, apply green dots arranged in a triangle shape on your accent nail. Accent with a tiny yellow or gold dot at the top as the tree star.
Classic Red with Gold Tips:
-
Paint nails with two coats of red polish
-
Once dry, use a thin brush or striping tape to apply gold polish to the tips
-
Seal with a top coat for shine and durability

Snowflake Accent Nails:
-
Apply base color (dark or light)
-
Use a thin nail art brush or white nail pen for snowflake patterns on 1-2 nails
-
Finish with a clear top coat
Tips for all designs: Wait for layers to dry completely to prevent smudging, and use a fast-dry top coat for a polished finish.

5. Nail Art Maintenance Tips
Maintaining your festive nails is crucial to enjoy your designs longer. A key habit is to reapply a clear top coat every two to three days, which seals the polish and prevents chips. To avoid damage, protect your nails from harsh chemicals or prolonged water exposure by wearing gloves when washing dishes or cleaning.
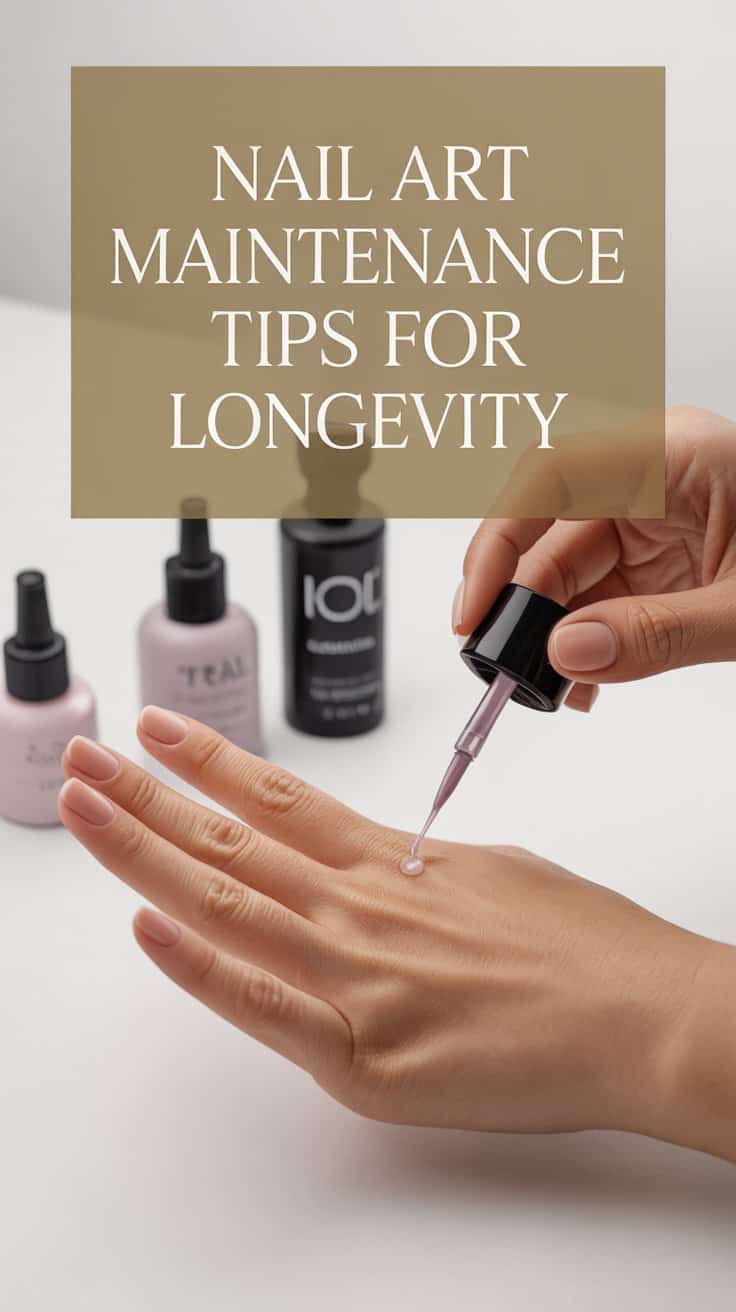
Keep nails and cuticles hydrated by applying moisturizing oils or creams daily. This prevents peeling and dryness that can ruin nail art. If minor chips occur, you can usually fix them by carefully touching up the polish and resealing with top coat. Proper maintenance doesn’t just extend wear but also keeps your nails healthy for the next designs.
Keep your festive nails looking fresh with these ideas:
-
Avoid harsh chemicals and wear gloves when needed
-
Apply a fresh layer of top coat every 2-3 days to protect the design
-
Moisturize cuticles and hands daily to prevent dryness
Keeping nails hydrated and protected helps your designs last through holiday festivities.
6. Creative Variations and Personalization Ideas
Once you master basic festive designs, feel free to experiment and personalize. Mixing matte and metallic polishes adds texture and a modern twist. Try decorating with rhinestones, glitter decals, or holographic stickers to elevate simpler looks. Combine different techniques on separate nails for variety—such as glitter gradients on thumbs and candy cane stripes on pinkies.
Adapt designs for upcoming celebrations too: add star motifs for New Year’s or include silver snowflakes for a frosty vibe. Don’t hesitate to blend colors or seasonal trends like rose gold or emerald green. Creativity and personalization make your nail art truly unique and festive!
-
Mix metallic and matte finishes for contrast
-
Experiment with different color combos like rose gold or emerald green
-
Add rhinestone clusters or holographic decals for sparkle
-
Adjust designs for New Year’s themes by adding stars or glitter bombs
The possibilities are endless and fun!
Summary
Festive nail art doesn’t have to be complicated or costly. With the right tools, simple prep, and easy designs, even beginners can create stunning holiday nails at home. Use this guide to get inspired, experiment, and express your holiday spirit creatively and beautifully. Happy painting!
Frequently Asked Questions (FAQs)
How long does DIY festive nail art last?
With proper prep and maintenance like applying top coats and moisturizing, your nail art can last 5-7 days or longer.
Can I do nail art without special tools?
Absolutely! Household items like toothpicks, bobby pins, or thin brushes can substitute for dotting tools and striping tape.
What base and top coats should beginners use?
Look for clear, fast-drying, strengthening formulas to protect nails and help polish last.
How do I fix mistakes without ruining the whole design?
Use a small brush dipped in polish remover to carefully clean edges or apply designs over minor smudges if possible.
Are these nail designs safe for weak or brittle nails?
These are gentle designs, but ensure nails are healthy beforehand and avoid harsh removers, which can worsen brittleness.